

Acrylic Shower Cleaning and Maintenance Tips for 2026
Table of Contents
Why Acrylic Showers Need a Different Cleaning Approach
Best Cleaning Products for Acrylic Showers
Products to Avoid on Acrylic Surfaces
A Daily Shower Maintenance Routine That Takes Two Minutes
How to Remove Hard Water Stains From Acrylic
The Escalation Ladder
When Vinegar Works and When It Does Not
Why Your Water Quality Drives the Whole Problem
Step-by-Step Deep Cleaning Process for Acrylic Showers
Troubleshooting Stubborn Stains, Scratches, and Dullness
Repairing Minor Scratches and Restoring Shine
Eco-Friendly and Non-Toxic Cleaning Alternatives
Conclusion
Frequently Asked Questions
Last Updated: September 29, 2026
Why Acrylic Showers Need a Different Cleaning Approach
Acrylic shower cleaning starts with one fact most homeowners learn the hard way: acrylic is a plastic, not tile. Its glossy surface resists stains but is soft, a scouring pad that leaves porcelain untouched will dull acrylic permanently in seconds.
This guide from TRC Home Improvement covers the products that work, the ones that cause chemical damage, and the routines that keep a shower looking new.
Best Cleaning Products for Acrylic Showers
The best cleaning products for acrylic showers are mild, non-abrasive, and pH-neutral. Anything labeled a mild household cleaner and safe for plastics works.
A basic kit covers almost every situation:
A mild liquid dish soap or a pH-neutral foaming cleanser
A spray bottle of white vinegar diluted with water for mineral deposits
Several microfiber cloths, kept separate from kitchen rags
A silicone squeegee with a soft, undamaged blade
A soft-bristle brush for textured surfaces and grout lines
Products to Avoid on Acrylic Surfaces
Never use abrasive cleaners on acrylic: no scouring pads, steel wool, powdered cleansers, or cream cleansers marketed for tile. Each removes the glossy layer, and once it is gone, stains stick faster.
Avoid these as well:
Chlorine bleach and other harsh disinfectants left to sit, which can dull and discolor the surface finish
Ammonia-based glass cleaners, which attack some plastics
Drain cleaners splashed onto the shower base, which cause chemical damage
Any cleaner that warns against use on plastics or fiberglass
Watch Out A single pass with a scouring pad can leave a permanent dull patch on an acrylic shower base. The scratch traps soap scum, and the spot darkens within weeks. There is no cleaner that reverses it, only polishing.
A Daily Shower Maintenance Routine That Takes Two Minutes
The full routine:
CNYs Open House
Squeegee the walls first. Start at the top and pull down in overlapping strokes, working left to right. Overlap by about half the blade width so you do not leave stripes of water between passes.
Squeegee the floor toward the drain. Use the same blade or a dedicated floor squeegee. On textured floors, angle the blade and use shorter strokes so it follows the pattern instead of skipping over it.
Wipe the corners and the door track. These are the spots a squeegee cannot reach. A microfiber cloth wrung out in warm water handles them in seconds.
Wring the cloth and hang it to dry. A damp cloth left in the enclosure becomes a mildew source. Hang it over the door or a hook outside the shower.
Leave the door ajar or the curtain spread. Air movement is what actually dries the enclosure. A closed door traps a humid pocket that feeds mildew in caulk lines and corners.
Squeegeed and ventilated after every use: deep clean roughly once a month.
Squeegeed most days but left closed: every two to three weeks.
No daily habit: every week to ten days, and expect hard water film to build anyway.
Pro Tip Keep a squeegee hanging inside the enclosure where you can reach it without stepping out. The most common reason daily maintenance fails is that the tool is stored under the sink.
What daily maintenance cannot do. It will not remove existing hard water deposits or stop mildew already rooted in caulk, those need the targeted methods below. It keeps the surface from reaching that point, which is why it is the cheapest, highest-return habit in acrylic shower care.
How to Remove Hard Water Stains From Acrylic
To remove hard water stains from acrylic, start with a diluted vinegar solution and a microfiber cloth, then escalate only if the deposit survives. Hard water leaves calcium and magnesium deposits that chemically bond to the surface as a cloudy white film, so wiping harder does nothing, the fix is dissolving the bond, not scrubbing it off.
The Escalation Ladder
Work through these steps in order and stop as soon as the film lifts. Skipping ahead risks damaging the finish.
When Vinegar Works and When It Does Not
Vinegar works on mineral deposits and light soap scum. It does not work on mildew, etching, or scratches, it dissolves calcium, but does nothing for organic growth.
Why Your Water Quality Drives the Whole Problem
This is why some homeowners fight hard water stains forever while their neighbors never see them. Water hardness is measured in grains per gallon (gpg) of dissolved calcium and magnesium; the higher the number, the faster minerals deposit on every surface the water touches, including acrylic.
Soft water (roughly 0 to 3 gpg): mineral film builds slowly. Vinegar handles it easily, and deep cleaning can stretch to every four to six weeks.
Moderately hard water (roughly 3 to 7 gpg): the common range in much of the country. Expect visible film within a few weeks without a daily squeegee habit, and plan on monthly deep cleaning.
Hard to very hard water (roughly 7 gpg and up): film can appear within days. Vinegar becomes a maintenance tool rather than a fix, and you will be cleaning far more often than you would like.
Pro Tip If you are not sure whether your film is mineral or soap scum, test it. Vinegar fizzes slightly on mineral deposits and does nothing on soap scum. Soap scum responds to a mild detergent or a foaming cleanser, while minerals respond to acid. Using the wrong one wastes time and can leave you scrubbing, which is exactly what damages acrylic.
Watch Out Never mix vinegar or any acid cleaner with chlorine bleach. The combination releases chlorine gas, which is dangerous in an enclosed shower. If you have just used a bleach-based product, rinse the surface thoroughly and ventilate before applying anything acidic.
Step-by-Step Deep Cleaning Process for Acrylic Showers
A full deep cleaning follows a fixed order: dry dust first, then soap scum, then minerals, then rinse and dry. That sequence prevents smearing loosened grime back onto clean surfaces.
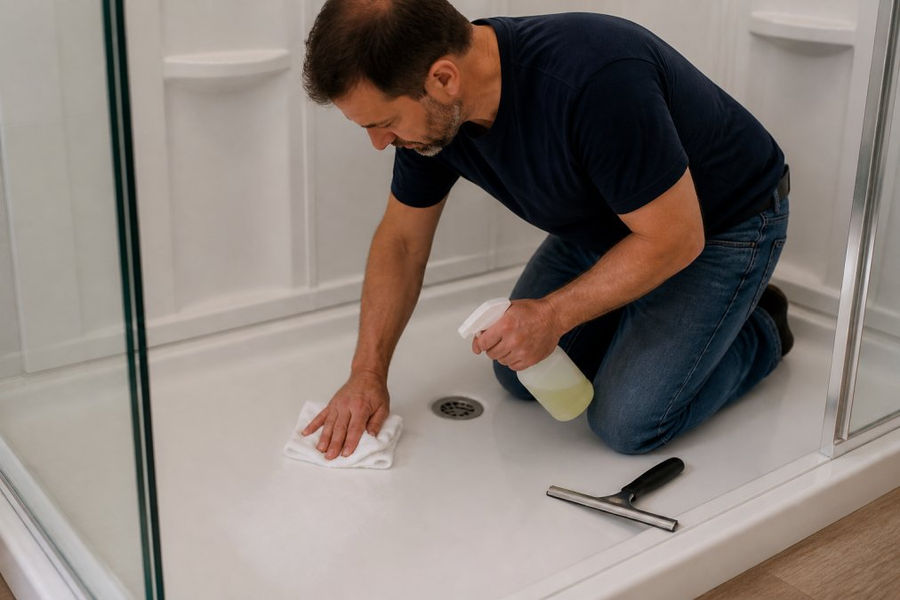
Clear the shower. Remove bottles, mats, and the showerhead if it unscrews easily.
Dust the dry surface. Wipe loose hair and dust with a dry microfiber cloth before adding any liquid.
Wash with mild detergent. Apply dish soap or foaming cleanser with a soft cloth, working top to bottom.
Rinse thoroughly. Warm water, start high, finish at the drain. Leftover soap film attracts new grime.
Treat soap scum and minerals. Spray the vinegar solution on cloudy areas and let it dwell.
Clean the grout and seams. A soft-bristle brush and mild cleaner handle grout cleaning without scratching the acrylic.
Rinse again and dry completely. A squeegee first, then a dry cloth on the floor and lower walls.
Troubleshooting Stubborn Stains, Scratches, and Dullness
Stubborn problems fall into three categories: stains, scratches, and overall dullness. Each has a different fix, scrubbing a scratch never helps, and polishing a stain rarely does.
For specific stains, match the cleaner to the cause:
Rust-colored marks: a cleaner labeled for rust removal that is safe on plastics, applied briefly and rinsed
Mildew in corners: a mildew removal product, with the fan running
Soap scum that vinegar won't budge: a non-abrasive foaming cleanser and more dwell time
Dye or hair product stains: a paste of baking soda and water, applied gently with a microfiber cloth
Repairing Minor Scratches and Restoring Shine
Minor scratches can be repaired. Deep gouges generally cannot, at least not invisibly. For light scratches, a polishing compound designed for plastic or acrylic, applied with a soft cloth in small circles, will blend the scratch into the surrounding surface.
The process:
Clean and dry the area completely
Apply a small amount of plastic polishing compound to a microfiber cloth
Work it into the scratch in small circles with light pressure
Wipe away residue and check the surface in raking light
Repeat in short sessions rather than one long pass
Finish with a coat of acrylic-safe wax to protect the repaired area
Watch Out If a scratch catches a fingernail, it is too deep for polishing compound. Keep working it and you will thin the acrylic around it. Call a professional before you make it worse.
Eco-Friendly and Non-Toxic Cleaning Alternatives
Non-toxic alternatives handle most acrylic shower cleaning without harsh chemicals: vinegar, baking soda, castile soap, and plain warm water with a microfiber cloth. That covers daily maintenance and most deep cleaning.
Conclusion
Acrylic showers reward consistency and punish shortcuts. A two-minute daily routine, mild products, and a soft cloth keep the surface glossy for years, while one abrasive pad can undo months of good habits. When scratches, dullness, or a failing shower base go past what cleaning can fix, replacement is the smarter spend.
Frequently Asked Questions
What should I clean my acrylic shower with?
Use a mild household cleaner or a few drops of dish soap mixed with warm water, applied with a non-abrasive microfiber cloth or soft sponge. For routine upkeep, a 50/50 vinegar solution works on light soap scum but should be rinsed thoroughly afterward. Avoid anything labeled abrasive, and skip scouring pads, steel wool, and cleaners containing ammonia or bleach, since these dull the surface finish and can cause chemical damage over time.
How do I remove hard water stains from acrylic without scratching it?
Soak a microfiber cloth in white vinegar and lay it over the mineral deposits for 15 to 20 minutes, then wipe gently. For heavier buildup, a non-abrasive foaming cleanser designed for acrylic will lift hard water stains without dulling the surface. Rinse thoroughly and dry with a separate cloth. If your area has especially hard water, a daily squeegee routine prevents those deposits from bonding in the first place.
How often should I deep clean my acrylic shower?
A daily shower maintenance routine of squeegeeing and a quick rinse handles most of the work. Plan a deep cleaning once a week using a mild detergent and microfiber cloth, and step it up to twice weekly if your household has multiple users or you notice soap scum returning quickly. Deep cleaning is also the right time to check grout lines and the shower enclosure edges for mildew removal needs before they spread.
Can I use a Magic Eraser on my acrylic shower?
Magic Erasers and similar melamine sponges work like a very fine abrasive, so repeated use will slowly dull the surface finish and leave the acrylic looking hazy. For occasional spot treatment on a stubborn mark, light pressure is unlikely to cause visible harm, but do not make it part of your regular cleaning routine. A microfiber cloth with mild detergent or a non-abrasive foaming cleanser is safer for stain prevention and long-term surface integrity.
Contact Us

Comments