

Custom Tiled Shower Installation: Step-by-Step
Table of Contents
What You'll Need Before Starting
Demolition and Subfloor Preparation
Shower Waterproofing Methods That Prevent Leaks Waterproofing Membrane Installation Cement Backer Board Setup
Waterproofing Membrane Installation
Cement Backer Board Setup
Installing the Shower Pan and Planning Slope to Drain
Plumbing and Drain Installation for Custom Tiled Showers
Layout and Tile Positioning for Professional Results
How Long Does a Shower Remodel Take
Applying Thin-Set Mortar and Setting Tile
Last Updated: August 12, 2026
What You'll Need Before Starting
Custom tiled shower installation requires specific tools and materials to ensure durability and proper waterproofing. Gather everything before demolition begins to avoid costly delays.
Essential tools include a wet saw for tile cuts, tile spacers, a margin trowel for thin-set mortar, a grout float, a leveling system, safety equipment (dust masks, safety glasses, work gloves), a pry bar, and a moisture meter.
Materials are equally critical. Cement backer board replaces standard drywall in wet areas. You'll need waterproofing membrane (liquid or sheet form), thin-set mortar (modified for walls, unmodified for floors), grout (epoxy or standard), silicone caulk for movement joints, and your chosen tile. Pre-sloped foam trays simplify shower pan installation.
At TRC Home Improvement, we've found that having the right materials on hand prevents common delays. Many homeowners underestimate how much thin-set and grout they'll need.
Pro Tip Buy 10-15% extra tile for breakage, cuts, and future repairs. Purchasing all tile upfront prevents color variation from different production runs.
Demolition and Subfloor Preparation
Removing an old shower reveals hidden problems that must be addressed before installation begins. Improper demolition can damage the subfloor, plumbing, or surrounding walls.
Turn off water supply and remove fixtures. Use a pry bar to carefully remove old tile, grout, and shower pan. Work methodically to avoid puncturing plumbing lines or damaging studs. Inspect the subfloor carefully for soft spots, discoloration, or mold, signs of water damage requiring replacement.
If you find rot or mold, remove damaged wood, allow the area to dry completely, and install new lumber using pressure-treated or cement board as appropriate. The subfloor must be solid, level, and completely dry. Use a moisture meter to verify subfloor moisture is below 15%, which will compromise waterproofing and cause future leaks. If damp, run fans and dehumidifiers until readings drop to acceptable levels.
Watch Out Failing to fully dry the subfloor before waterproofing is one of the most common installation failures. Trapped moisture leads to mold growth, delamination, and leaks within 1-3 years.
Shower Waterproofing Methods That Prevent Leaks
Waterproofing is the single most important factor determining whether your custom tiled shower stays dry for decades or develops leaks within years.
Waterproofing Membrane Installation
A waterproofing membrane creates a continuous barrier that redirects water to the drain. Two main types exist: liquid membranes (applied with a roller or brush) and sheet membranes (rolled out and sealed at seams).
Liquid membranes work well for complex shapes and tight corners. Apply them in thin, even coats per manufacturer instructions, typically 2-3 coats. Allow proper drying time between coats to avoid thin spots where water can penetrate.
Sheet membranes offer faster application and more predictable coverage. Roll them out, overlap seams by 6 inches minimum, and seal seams with compatible sealant or tape.
The membrane must extend up the walls at least 6 inches above the finished shower pan height and wrap around the drain flange completely. Any penetration (pipes, drains, fixtures) requires careful sealing with compatible sealant.
Cement Backer Board Setup
Cement backer board replaces drywall in shower walls. Install it with backer board screws spaced 8 inches apart, offsetting seams so they don't align with subfloor seams or tile grout lines.
Tape and seal all backer board seams with waterproof joint compound. Leave 1/8-inch gaps between sheets and around penetrations for expansion. Apply waterproofing membrane over the backer board. This layered approach creates redundant protection: if water penetrates the tile and grout, the membrane stops it; if the membrane has a pinhole, the backer board resists moisture.
Installing the Shower Pan and Planning Slope to Drain
The shower pan must slope toward the drain consistently so water drains rather than pooling. Use a slope of 1/4 inch per foot toward the drain, barely noticeable but sufficient for complete drainage.
If using a pre-sloped foam tray, installation is straightforward: set it on the prepared subfloor, secure per manufacturer instructions, and connect the drain. If building a custom slope with mortar, mark your drain location and calculate the height needed at the shower curb or walls. Build up the subfloor using sloped mortar or self-leveling underlayment. A laser level helps verify slope accuracy.
Once the slope is established and mortar has cured, install the shower pan liner. The liner must extend up the walls and wrap completely around the drain. Smooth out any wrinkles or folds that trap water.
Key Takeaway The shower pan slope is non-negotiable. Water must flow to the drain, not collect anywhere on the floor. This single detail prevents 90% of long-term shower problems.
Plumbing and Drain Installation for Custom Tiled Showers
Plumbing rough-in happens before waterproofing. Supply lines and drain lines must be in place, tested, and verified before sealing everything behind waterproofing and tile.
Install a drain flange at the lowest point of the slope. The flange must be the correct height so the top sits flush with the finished pan surface. Weep holes in the drain flange allow water that escapes the pan liner to drain into the subfloor drain system rather than pooling.
Test all plumbing before sealing. Run water through supply lines and verify no leaks. Run water into the drain and confirm it flows freely. Any plumbing work after waterproofing is installed means cutting through protective barriers, which is expensive and risky.
Supply lines should be routed through studs or along walls where they won't be damaged by tile installation. Shower valve rough-in height is typically 48 inches from the floor.
Layout and Tile Positioning for Professional Results
Before applying a single piece of tile, plan your layout to ensure the finished shower looks balanced and professional.
Dry-lay tile on the floor without mortar, beginning at the drain and working outward. Account for how tile will be cut at the curb and walls, avoiding tiny slivers at prominent edges. For walls, center your layout vertically so the top row is roughly the same height on all sides.
Mark reference lines on the wall using a level and chalk line. These guides keep tile rows straight even if the wall is slightly out of plumb.
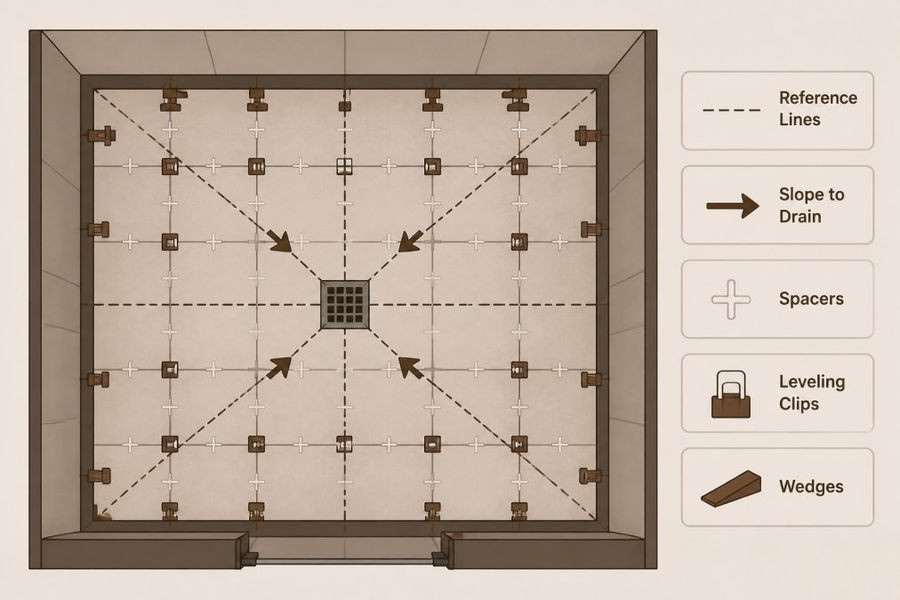
Consider the visual impact of grout lines. Wider grout lines (1/4 inch) are more forgiving of slight variations; narrower lines (1/8 inch) create a more seamless look but require precision.
Tile selection matters beyond aesthetics. Slip resistance is critical in showers. The Coefficient of Friction (DCOF) rating measures slip resistance; aim for tiles with DCOF 0.60 or higher for shower floors. Matte or textured finishes provide better grip than glossy tiles.
How Long Does a Shower Remodel Take
A complete custom tiled shower installation typically takes 2-4 weeks from demolition to finished product.
Demolition and subfloor preparation: 2-4 days. Waterproofing and backer board: 3-5 days. Plumbing and drain installation: 1-2 days. Tile layout, cutting, and installation: 5-7 days. Grout curing and sealing: 3-5 days.
The bathroom is typically unusable during demolition and waterproofing phases. Once tile installation begins, you can often use the toilet and sink if they're in the same bathroom. Full water use resumes after grout cures.
Pro Tip Plan for the project to take longer than estimates. Weather delays, unforeseen subfloor damage, and tile breakage happen. Building in a 1-week buffer prevents stress when complications arise.
Applying Thin-Set Mortar and Setting Tile
Thin-set mortar bonds tile to the substrate. Improper application is a leading cause of tile failure.
Mix thin-set according to manufacturer instructions. Consistency should be thick enough to hold peaks when combed but thin enough to spread smoothly. Apply thin-set to the wall using a notched trowel held at a 45-degree angle, creating consistent ridges. Press each tile firmly into the mortar, twisting slightly to seat it fully. Use a leveling system to keep tiles perfectly aligned.
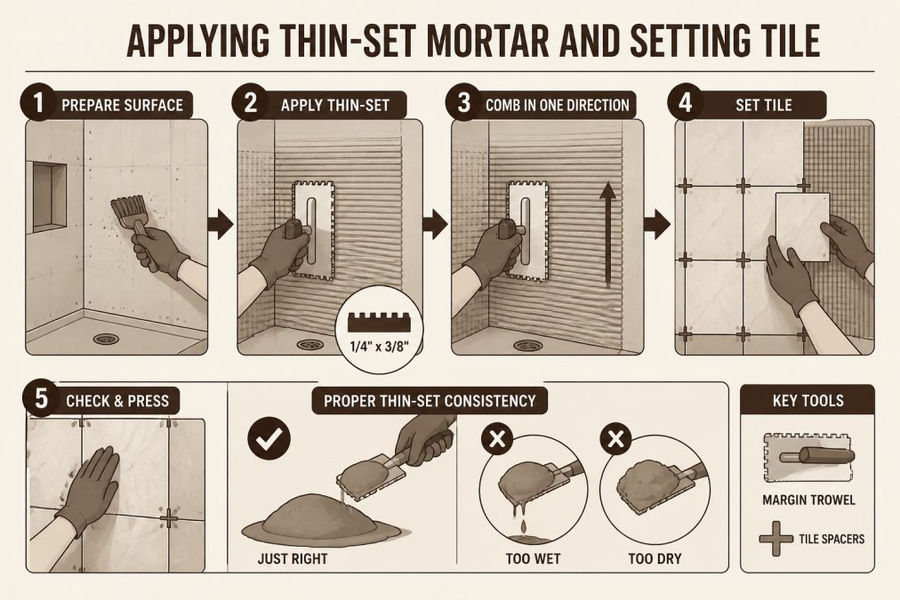
For floor tile, use unmodified thin-set. For walls, modified thin-set works well. Work in small sections (roughly 3-4 square feet) so mortar doesn't skin over before you set tile. Check frequently that tile is level, plumb, and properly spaced.
After tile is set and mortar has cured (typically 24 hours), apply grout using a grout float to pack grout into joints, working diagonally across the tile. After initial set (15-20 minutes), use a damp sponge to wipe excess grout from tile faces.
Once grout fully cures (3-7 days depending on type), seal it. Grout is porous and absorbs water and stains. Sealer creates a protective barrier and dramatically extends grout life in high-moisture environments like showers.
Custom tiled shower installation is demanding work that tests both technical skill and attention to detail. The difference between a shower that lasts 30 years and one that fails in 5 years often comes down to waterproofing execution, proper slope, and careful tile setting. When water damage or outdated fixtures have compromised your bathroom, TRC Home Improvement can handle the complete renovation, from subfloor assessment through final grout sealing. Our team brings over 30 years of hands-on experience and advanced waterproofing techniques that ensure your investment lasts. Contact us for a free design consultation and no-pressure estimate to transform your bathroom into a durable, beautiful sanctuary.
Frequently Asked Questions
What are the most common mistakes in custom tiled shower installation?
The most common failures occur during waterproofing and slope installation. Insufficient waterproofing membrane coverage leads to leaks behind tile within months. Improper slope to drain (typically 1/4 inch per foot) causes water pooling. Using regular drywall instead of cement backer board allows moisture penetration. Inadequate thin-set mortar coverage leaves voids under tile that crack under weight. Finally, skipping movement joints or caulk in corners causes grout cracking as the structure shifts. Professional installation prevents these by using proper waterproofing barriers, verified slope, and industry-standard substrate preparation.
How long does a shower remodel take from start to finish?
A typical custom tiled shower installation takes 5-10 business days, depending on complexity and size. Demolition and subfloor prep: 1-2 days. Waterproofing membrane and backer board installation: 1-2 days. Plumbing rough-in and drain flange setup: 1 day. Tile layout and thin-set application: 2-3 days. Grouting and sealing: 1-2 days. Final caulking and cleanup: 1 day. Larger showers, intricate tile patterns, or unexpected subfloor damage can extend timelines. Most bathrooms remain partially usable during work, with full access restored once grouting is complete and cured (typically 48-72 hours).
What makes professional waterproofing different from standard methods?
Professional waterproofing uses multiple layers: a liquid waterproofing membrane applied to all substrate surfaces, cement backer board instead of standard drywall, and weep holes in the shower pan to direct trapped moisture to the drain. Standard installations often skip the membrane or use inadequate coverage. Professionals ensure 6-inch overlaps on all seams, tape all joints, and apply membrane to corners and penetrations where leaks typically start. This redundancy means water that breaches the grout and tile still cannot reach the subfloor. Proper waterproofing prevents the costly mold and rot damage that occurs when moisture sits behind tile, the leading cause of shower failure within 2-5 years.
What tools are required for professional-grade tile shower installation?
Essential tools include a wet saw for precise tile cuts, margin trowel for thin-set application, grout float for finishing joints, tile spacers for consistent grout lines, leveling system to maintain even surfaces, and tile nippers for small adjustments. You'll also need a waterproofing brush or roller, cement backer board screws, a drill-driver, measuring tape, and a level. Safety equipment, gloves, safety glasses, dust mask, and knee pads, are mandatory. A grout sponge and sealing applicator finish the job. Renting or purchasing quality tools ensures proper technique and prevents costly mistakes like uneven tile, inadequate mortar coverage, or damaged tile edges that compromise the final result.
Contact Us
This article was written using GrandRanker


Comments