

Walk-In Shower Conversion Timeline for Seniors: A Realistic Guide
Table of Contents
Why Seniors Choose Walk-In Shower Conversions
Walk-In Shower Conversion Timeline: What to Expect Pre-Renovation Planning Phase (Days 1-7) Permitting and Inspection Requirements Active Construction Phase (Days 8-20) Finishing and Final Inspection (Days 21-25)
Pre-Renovation Planning Phase (Days 1-7)
Permitting and Inspection Requirements
Active Construction Phase (Days 8-20)
Finishing and Final Inspection (Days 21-25)
Factors That Influence Project Duration Prefab vs. Custom Tile Installations Demolition and Plumbing Adjustments Subfloor and Waterproofing Complexity
Prefab vs. Custom Tile Installations
Demolition and Plumbing Adjustments
Subfloor and Waterproofing Complexity
Walk-In Shower Installation Steps: The Conversion Process Step 1: Demolition and Removal Step 2: Plumbing and Drainage Setup Step 3: Subfloor Preparation and Waterproofing Step 4: Shower Pan Installation and Tile Work Step 5: Fixtures, Grout, and Sealing
Step 1: Demolition and Removal
Step 2: Plumbing and Drainage Setup
Step 3: Subfloor Preparation and Waterproofing
Step 4: Shower Pan Installation and Tile Work
Step 5: Fixtures, Grout, and Sealing
ADA Bathroom Requirements for Seniors: Safety and Accessibility No-Step Entry and Curbless Shower Design Grab Bars, Built-In Seating, and Non-Slip Flooring Shower Valve Height and Handheld Shower Wand Placement
No-Step Entry and Curbless Shower Design
Grab Bars, Built-In Seating, and Non-Slip Flooring
Shower Valve Height and Handheld Shower Wand Placement
Walk-In Shower Conversion Cost: Budget Breakdown Materials and Labor Estimates Hidden Costs and Contingency Planning
Materials and Labor Estimates
Hidden Costs and Contingency Planning
Managing Life During Your Conversion: Temporary Accessibility Solutions
Insurance and Tax Deduction Eligibility for Home Modifications
Walk-In Shower Conversion Timeline for Seniors: A Realistic Guide
Last Updated: August 4, 2026
Why Seniors Choose Walk-In Shower Conversions
A walk-in shower conversion timeline for seniors typically spans 3-4 weeks from start to finish, depending on your bathroom layout and existing conditions. The primary driver is simple: safety and independence. When stepping over a tub becomes a daily risk, a curbless shower with grab bars and non-slip flooring becomes a lifeline that lets you age in place without fear of falling.
The accessibility modifications that matter most include no-step entry points, built-in seating, handheld shower wands at comfortable heights, and grab bars installed at ADA-compliant heights. Walk-in showers are also easier to maintain than tubs, no scrubbing around caulk lines that trap mold.
Pro Tip The conversion process doesn't have to be disruptive. Most homeowners can use a guest bathroom during the 2-3 week active construction phase. Planning ahead minimizes stress on your daily routine.
Walk-In Shower Conversion Timeline: What to Expect
Understanding the timeline helps you plan around disruption. The process breaks into four distinct phases, each with its own timeline and decision points.
Pre-Renovation Planning Phase (Days 1-7)
Your first week focuses on design decisions and logistical preparation. You'll choose tile style, decide on shower pan type (prefab vs. custom), select fixture finishes, and confirm grab bar placement and handheld shower wand height. These decisions matter, the tile will be with you for 20+ years, and grab bar placement directly affects your comfort and safety.
During days 1-7, secure any required permits. In North Carolina and South Carolina, bathroom renovations involving plumbing changes typically require a building permit. The permitting process takes 3-7 days depending on your local jurisdiction, so starting early prevents delays.
Permitting and Inspection Requirements
Most jurisdictions require permits for bathroom renovations involving plumbing, electrical, or structural changes. A walk-in shower conversion almost always triggers permitting because you're modifying the shower pan, drainage system, and often the shower valve location.
The permit process typically takes 3-5 business days for review. Once work begins, you'll have rough-in inspections (after plumbing and electrical are installed but before walls close up) and a final inspection after completion.
Watch Out Skipping permits to save time creates serious problems later. Unpermitted work can prevent you from selling your home, void your insurance coverage, and leave you liable if something goes wrong. The permit cost is typically $150-400 and the timeline addition is only 5-7 days.
Active Construction Phase (Days 8-20)
This is when the real work happens. Your bathroom becomes a construction zone for 10-13 working days. The sequence is critical: demolition, plumbing adjustments, subfloor prep, waterproofing, shower pan installation, tile work, and fixture installation.
Demolition (days 8-9) removes your old tub, surround, and any damaged subfloor or wall framing. This is dusty and loud, plan to use another bathroom during this phase.
Plumbing adjustments (days 9-10) reposition the shower valve if needed and adjust drain lines. Hidden issues sometimes emerge here: rotted subfloor, outdated plumbing, or structural concerns. Experienced contractors budget for contingencies because discovering problems mid-project is common.
Subfloor preparation and waterproofing (days 11-13) is critical for longevity. If the subfloor is compromised, it gets replaced. A waterproof membrane is then applied to prevent water from seeping into walls and causing mold.
Shower pan installation and tile work (days 14-19) brings your design to life. Prefab pans install in one day. Custom tile work takes longer because each tile must be cut, set, grouted, and sealed.
Finishing and Final Inspection (Days 21-25)
The final phase includes fixture installation (shower head, handheld wand, grab bars, built-in seating), grout sealing, final caulking, and cleanup. Your local building inspector conducts a final walkthrough to verify code compliance. Once approved, you're cleared to use your new shower.

Factors That Influence Project Duration
The timeline assumes a straightforward conversion with no major surprises. Real projects often deviate based on several factors.
Prefab vs. Custom Tile Installations
Prefab shower kits speed up installation dramatically. A prefab pan, surround, and fixtures install in 2-3 days total. Custom tile installations take longer but offer complete design freedom. Every tile is selected, cut, and installed individually, typically taking 5-7 days compared to 1-2 days for prefab.
For seniors prioritizing accessibility, custom tile offers an advantage: you can design the layout around grab bar placement, built-in seating, and shower valve height.
Installation Type | Timeline | Customization | Cost Flexibility | Best For |
Prefab Kit | 2-3 days | Limited | Fixed | Budget-conscious, standard sizes |
Custom Tile | 5-7 days | Complete | High | Design-focused, accessibility needs |
Demolition and Plumbing Adjustments
Demolition usually takes 1-2 days unless complications arise. The real timeline wildcard is plumbing. If your existing shower valve is in the right location and the drain slopes correctly, adjustments are minimal. If the valve needs repositioning or the drain requires rerouting, add 1-2 days.
Hidden issues discovered during demolition, rotted subfloor, outdated pipes needing replacement, structural damage, add time and cost. Experienced contractors budget contingency time because this is common.
Key Takeaway Budget an extra 2-3 days into your timeline as a contingency. Most projects don't need it, but when you do hit an issue, built-in buffer time prevents stress and keeps the project moving.
Subfloor and Waterproofing Complexity
If your subfloor is solid and dry, prep and waterproofing takes 1-2 days. If the subfloor has damage, add 2-3 days for replacement. Waterproofing is non-negotiable for longevity, using multiple layers: a waterproof membrane under the tile, proper slope for drainage, and sealed grout.
Walk-In Shower Installation Steps: The Conversion Process
The conversion follows a logical sequence. Understanding each step helps you know what to expect and why each phase matters.
Step 1: Demolition and Removal
Demolition removes the old tub, surround, and fixtures. Once removed, the subfloor is inspected. If it shows water damage, soft spots, or rot, it gets replaced. This is when hidden problems reveal themselves.
Step 2: Plumbing and Drainage Setup
The shower valve needs proper positioning. For seniors, the standard height is 48 inches from the floor, reachable without overextending. The handheld shower wand is typically mounted 6 inches to the side of the fixed shower head.
The drain is critical for curbless showers, requiring proper slope of 1/4 inch per foot toward the drain. If your existing drain is in the wrong location, it needs rerouting.
Step 3: Subfloor Preparation and Waterproofing
Once plumbing is set, the subfloor is prepared. If being replaced, new plywood rated for wet areas is installed. A waterproof membrane is then applied, either liquid-applied or sheet membrane, to prevent water from reaching the framing and causing mold or rot.
Step 4: Shower Pan Installation and Tile Work
Prefab pans are set into place, leveled, and secured quickly. For custom tile, the shower pan is installed first, then tile is laid. Each tile is set in thin-set mortar, spaced consistently, and cut as needed. Grab bars are installed before tile to ensure proper anchoring into the framing.
Step 5: Fixtures, Grout, and Sealing
Once tile is set (after 24 hours for mortar to cure), grout is applied. After grout cures (typically 72 hours), it's sealed with penetrating sealer to prevent water absorption and mold growth. Fixtures are installed: shower head, handheld wand, valve trim, grab bars, and built-in seating. Everything is tested for proper function, and caulk is applied where tile meets walls or other surfaces.
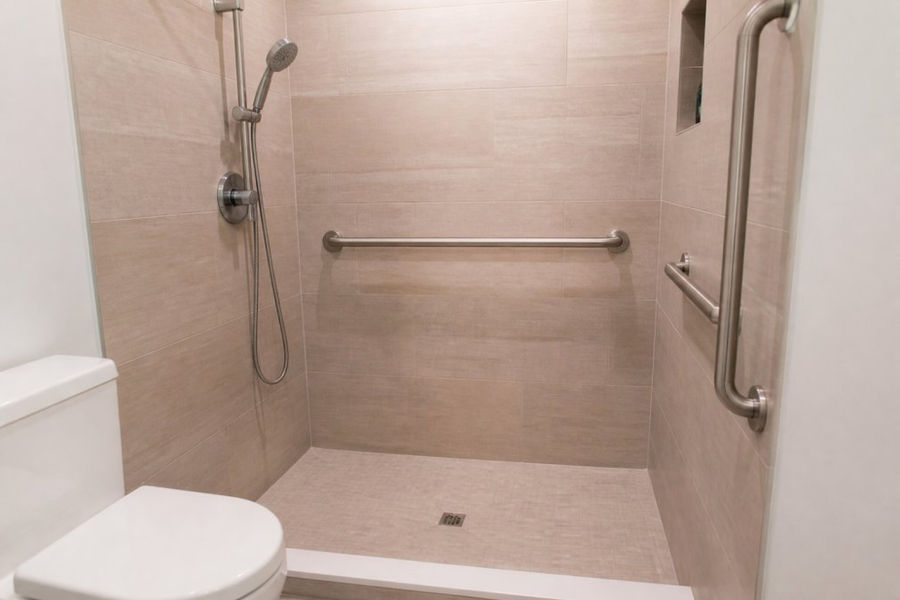
ADA Bathroom Requirements for Seniors: Safety and Accessibility
ADA compliance principles ensure bathrooms work for aging bodies. Many seniors don't need full ADA compliance, but these principles ensure accessibility and safety.
No-Step Entry and Curbless Shower Design
A curbless shower has no threshold, you step directly from the bathroom floor into the shower. This is the single most important accessibility feature for seniors. No tripping hazard, no balance challenge, no risk of catching a foot on the edge. Curbless showers require proper slope for drainage so water drains cleanly without pooling on the bathroom floor.
Grab Bars, Built-In Seating, and Non-Slip Flooring
Grab bars are installed at 1.5 inches from the wall, at heights of 33-36 inches for horizontal bars and 38-48 inches for vertical bars. They're anchored into the framing to support body weight safely.
Built-in seating, a bench or seat in the shower, is invaluable for seniors who tire easily or have balance concerns. A bench allows showering while seated, reducing fall risk dramatically. The bench should be 17-19 inches high and 15-16 inches deep.
Non-slip flooring is critical. The shower floor should have a textured surface or non-slip coating to prevent slipping when wet.
Shower Valve Height and Handheld Shower Wand Placement
The shower valve should be positioned at 38-48 inches from the floor, reachable without stretching or bending. For seniors with limited reach, lower placement (closer to 38 inches) is better.
A handheld shower wand is essential for seniors who can't stand under a fixed shower head comfortably. The wand allows you to direct water where needed, shower while seated, and control temperature and flow easily.
Best For Seniors with arthritis, limited mobility, or balance concerns benefit most from a combination of grab bars at multiple heights, built-in seating, a handheld wand, and textured non-slip flooring.
Walk-In Shower Conversion Cost: Budget Breakdown
The walk-in shower conversion timeline for seniors often raises cost questions. While we don't publish specific pricing at TRC Home Improvement, we can explain how project costs are structured.
Materials and Labor Estimates
Materials typically include the shower pan, tile, grout, sealers, waterproofing membrane, fixtures (shower head, handheld wand, valve), grab bars, and any structural repairs. Labor covers demolition, plumbing work, subfloor prep, waterproofing, tile installation, and fixture installation.
The cost range varies dramatically based on choices: prefab shower kits with basic fixtures are the most budget-conscious option, while custom tile with high-end fixtures is significantly higher. Structural repairs add substantial cost. For accurate pricing tailored to your specific project, TRC Home Improvement offers free design consultations and no-pressure estimates.
Hidden Costs and Contingency Planning
Hidden costs emerge when demolition reveals problems: rotted subfloor, outdated plumbing, structural issues, or mold. Budget a 10-15% contingency for unexpected issues. Other costs to anticipate include permits and inspections (typically $150-400), temporary accessibility solutions during construction, and potential water damage restoration if mold is discovered.
Managing Life During Your Conversion: Temporary Accessibility Solutions
The 2-3 week active construction phase means your primary bathroom is unusable. Many seniors arrange to use a guest bathroom or a family member's bathroom during construction. If that's not possible, temporary accessibility solutions help: install grab bars in an alternative bathroom temporarily, rent a shower chair or transfer bench for the guest bathroom, use a handheld shower wand in the guest bathroom if available, and schedule showers during less busy times.
Some contractors can stagger work to minimize full-bathroom closure time. Discuss scheduling options during your initial consultation.
Pro Tip Communicate your mobility needs with your contractor upfront. They can often adjust the work schedule to minimize your inconvenience. If you live alone, consider having a family member nearby during the first week of construction.
Insurance and Tax Deduction Eligibility for Home Modifications
Some homeowners insurance policies cover accessibility modifications if deemed necessary for medical reasons. If your doctor has recommended a walk-in shower for safety or mobility reasons, check with your insurance provider. You may be able to document this with a medical letter.
Tax deductions for home modifications are possible under specific circumstances. The IRS allows deductions for home improvements that are medically necessary and recommended by a physician. A walk-in shower conversion might qualify if prescribed for a documented medical condition. Consult a tax professional to determine eligibility, documentation is essential.
A walk-in shower conversion timeline for seniors is manageable when you understand the process and plan accordingly. Most projects span 3-4 weeks from design to completion, with the active construction phase lasting 10-13 working days. The disruption is temporary, but the safety and independence you gain lasts for decades.
At TRC Home Improvement, we've guided hundreds of seniors through this transformation with our fully licensed team in North Carolina and South Carolina. We specialize in custom tiled walk-in showers and seamless tub-to-shower conversions using advanced waterproofing techniques that ensure durability. Our free design consultations help you make the right choices for your space and mobility needs, and our no-pressure estimates let you plan your budget confidently. Contact TRC Home Improvement today to schedule your consultation and take the first step toward a safer, more accessible bathroom.
Frequently Asked Questions
How long does a walk-in shower conversion typically take for seniors?
A typical walk-in shower conversion takes 2-4 weeks from start to finish, including planning, permits, demolition, plumbing adjustments, waterproofing, tile installation, and final inspection. The actual construction phase averages 10-15 working days. Timeline varies based on project complexity, whether you choose prefab kits or custom tile, and any unforeseen structural issues discovered during demolition. Your contractor should provide a detailed schedule upfront.
What are the main ADA bathroom requirements for seniors in a walk-in shower?
Key ADA requirements include a curbless or no-step entry to prevent tripping hazards, grab bars installed at 33-36 inches from the floor, non-slip flooring to reduce fall risk, a handheld shower wand for flexibility, and built-in seating or a fold-down bench. Shower valve controls should be accessible and easy to operate. Doorways must be at least 32 inches wide. These features improve safety and mobility for seniors with varying levels of physical ability.
What should I do with my bathroom during the renovation if I only have one shower?
Plan temporary accessibility solutions before work begins. Consider using a nearby bathroom, installing a portable shower chair in another tub, or arranging to stay with family during the heaviest construction phase (typically 1-2 weeks). Some contractors can schedule work in phases to minimize disruption. Discuss bathroom access and timeline with your contractor during the initial consultation to minimize inconvenience and ensure you have safe alternatives during the conversion.
Can I deduct walk-in shower conversion costs from my taxes or use insurance?
Some walk-in shower modifications may qualify for tax deductions if they are medically necessary and meet IRS criteria for home modifications related to a disability. You'll need documentation from a healthcare provider. Medicare typically does not cover bathroom renovations, but some state Medicaid programs, Veterans benefits, or local aging services may offer assistance. Check with your tax professional and insurance provider about your specific situation to understand available programs.
What makes waterproofing critical in a walk-in shower conversion?
Proper waterproofing prevents water from seeping into subfloors, walls, and foundations, which causes costly mold, rot, and structural damage over time. Quality waterproofing involves sealing the shower pan, using waterproof membranes behind tile, and ensuring proper drainage. Grout maintenance and regular inspections help extend the life of your waterproofing. A shower that leaks within 1-2 years indicates poor waterproofing practices. Choosing a contractor experienced in advanced waterproofing techniques protects your investment long-term.
Get Started Today
This article was written using GrandRanker


Comments