

Aging-in-Place Bathroom Design: A Complete Guide
Table of Contents
What Aging-in-Place Bathroom Design Means
Essential Features for Aging-in-Place Bathrooms
Curbless Showers and Low-Threshold Entry
Grab Bars and Structural Support
Accessible Vanities and Comfort-Height Toilets
Handheld Showerheads and Accessible Controls
Non-Slip Bathroom Flooring and Fall Prevention
Walk-in Shower for Seniors: Design and Installation
Shower Benches and Built-in Seating
Clear Floor Space and Circulation
Bathroom Grab Bar Placement and Installation
Aging-in-Place Bathroom Remodel Checklist
Planning Your Layout and Measurements
Lighting and Visibility
Waterproofing and Durability
Retrofit Options for Existing Bathrooms
Frequently Asked Questions
Last Updated: October 10, 2026
What Aging-in-Place Bathroom Design Means
Aging-in-place bathroom design creates bathrooms that remain safe, accessible, and functional as mobility and physical abilities change over time. Rather than waiting for a crisis, homeowners who plan ahead can age comfortably in their own homes while reducing fall risk and maintaining dignity.
Universal design principles ensure features work for everyone. A curbless shower benefits anyone carrying supplies, not just walkers. Grab bars provide security for all users with balance concerns.
Planning ahead eliminates emergency modifications and gives homeowners years of confidence and comfort.
Essential Features for Aging-in-Place Bathrooms
The foundation of aging-in-place bathroom design rests on specific, measurable features that address the most common safety challenges. These elements work together to reduce fall risk, improve access, and make daily routines manageable regardless of changing physical abilities.
Curbless Showers and Low-Threshold Entry
A curbless shower eliminates the step that causes most bathroom falls, allowing seamless entry without tripping hazards.
Water containment happens through proper slope and drainage design. For aging-in-place bathroom design, this approach works whether someone uses a cane, walker, wheelchair, or needs no assistance, feeling natural and dignified rather than clinical.
Grab Bars and Structural Support
Grab bars provide critical support during high-risk moments: entering and exiting the shower, using the toilet, and moving between fixtures. Proper installation requires blocking, structural reinforcement behind walls, to support up to 300 pounds of force.
Placement matters: bars should be 1.25 inches in diameter, mounted 1.5 inches from the wall, and positioned where someone actually needs support, not where it looks decorative.
Accessible Vanities and Comfort-Height Toilets
Comfort-height toilets measure 17-19 inches, making it easier to sit and stand without straining knees or hips. Pairing with an accessible vanity with knee clearance underneath eliminates excessive bending or reaching.
An accessible vanity leaves 27 inches of clear floor space underneath for wheelchair or walker access. Lever-handle faucets require less grip strength, making them practical for anyone with arthritis.
Handheld Showerheads and Accessible Controls
A handheld showerhead on an adjustable slide bar lets users control water direction and height without reaching, especially valuable for anyone with limited mobility or balance concerns.
Lever handles and thermostatic valves prevent sudden temperature spikes. Mounting controls between 38-48 inches high keeps them within comfortable reach.
Non-Slip Bathroom Flooring and Fall Prevention
Aging-in-place bathroom design addresses slippery floors through material selection and surface treatment. Non-slip tile, textured surfaces, and proper grout choices reduce fall risk without clinical appearance.

Porcelain tile with matte or textured finish provides better grip. Coefficient of friction should be at least 0.6 for wet areas. Linear drains direct water away efficiently, keeping floors drier than traditional center drains.
Epoxy grout is more water-resistant than standard grout and resists mold. Proper waterproofing underneath prevents water from seeping into subfloors, where it causes structural damage.
Walk-in Shower for Seniors: Design and Installation
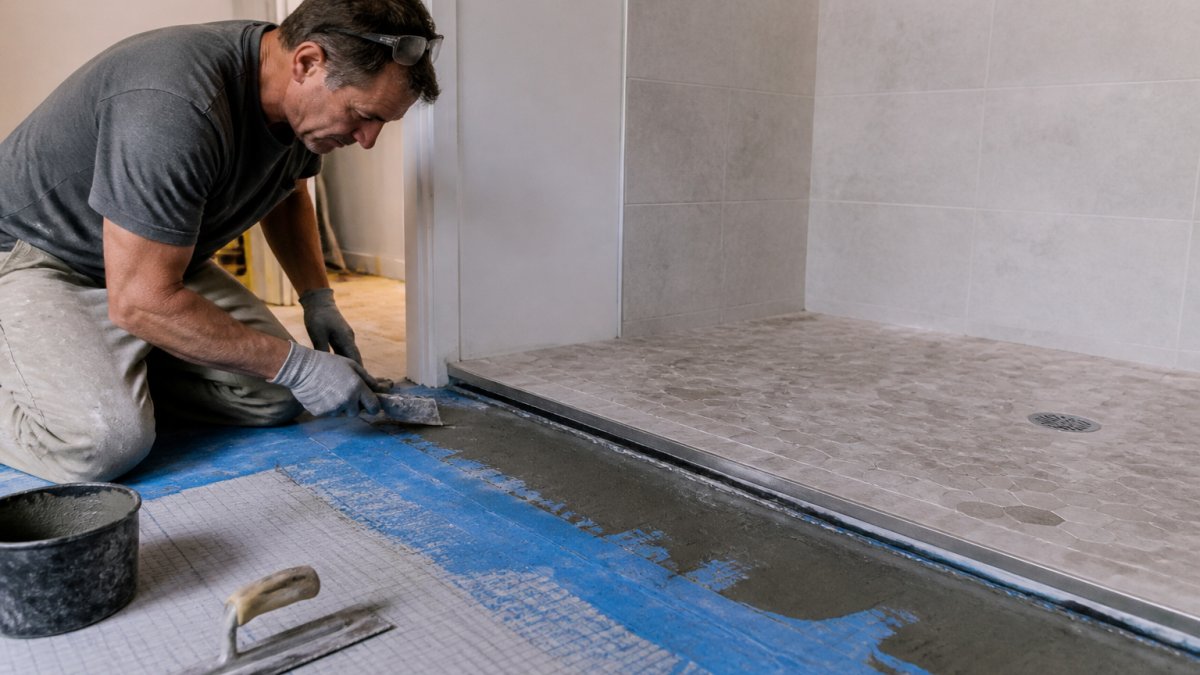
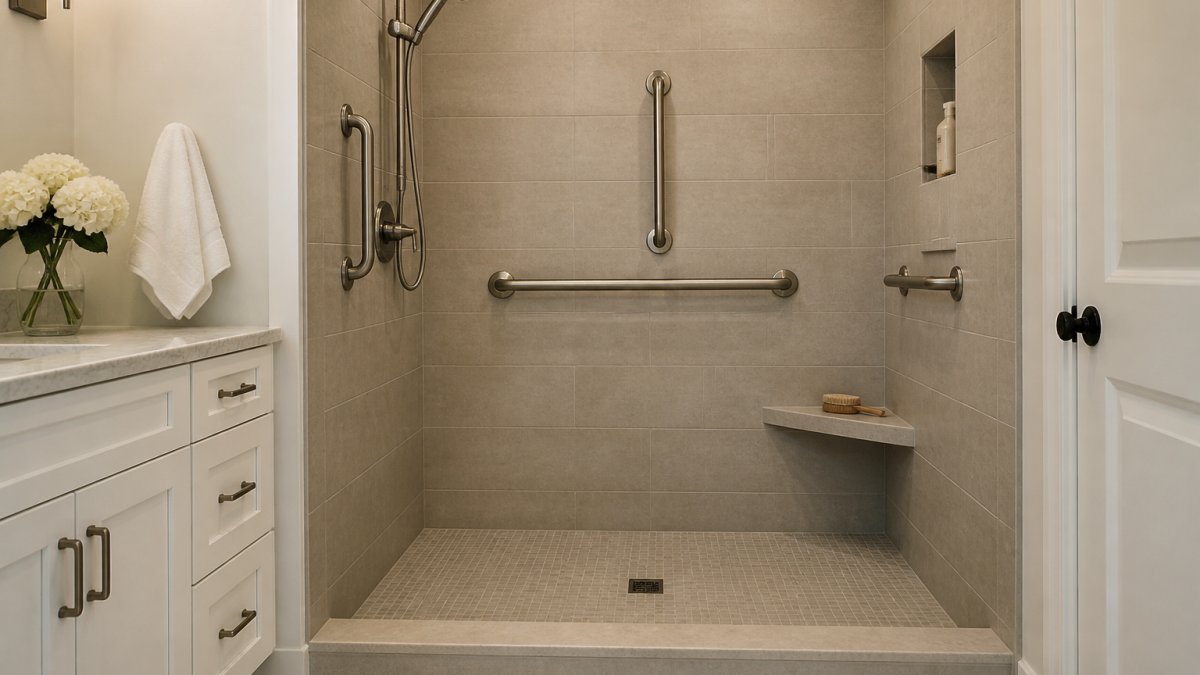
A walk-in shower for seniors is specifically designed to eliminate barriers and maximize safety for older adults. The design combines curbless entry, strategic grab bar placement, slip-resistant flooring, and adequate space for movement or assistance. Installation requires precision waterproofing to prevent leaks that compromise structural integrity and create long-term damage.
The process begins with proper slope, the shower floor slopes gently toward the drain so water flows away naturally rather than pooling. This slope is subtle enough that it's not noticeable to users but critical for water management.
Shower Benches and Built-in Seating
A shower bench provides a safe place to sit while bathing, reducing the need to balance on one foot while washing. For aging-in-place bathroom design, this feature is essential for anyone with balance issues, arthritis, or limited endurance.
Benches should be 17-19 inches high (matching comfort-height toilet height for consistency), 15-16 inches deep, and positioned where they don't interfere with water flow or grab bar placement. Non-slip surface treatment prevents sliding even when wet. A slight backrest or angled support makes it easier to sit and stand without gripping the walls.
Clear Floor Space and Circulation
Adequate floor space inside and outside the shower is essential for safety and accessibility. A walk-in shower for seniors should include at least 30 inches of clear floor space at the entry to allow room for turning, balance adjustments, or assistance from a caregiver.
Doorways leading to the bathroom should be at least 36 inches wide to allow wheelchair access. Hallways approaching the bathroom should have 36 inches of clear width. These measurements seem technical but directly determine whether aging-in-place bathroom design actually works when mobility changes.
Bathroom Grab Bar Placement and Installation
Grab bar placement is not arbitrary. Effective placement puts bars exactly where someone needs support during high-risk movements.
Beside the toilet, a horizontal bar 33-36 inches high and 24-36 inches long provides use for sitting and standing. Behind the toilet, a grab bar 24-36 inches long at the same height offers additional support.
Installation requires locating wall studs or installing blocking specifically for bar support. Bars should be mounted with stainless steel fasteners to prevent rust and corrosion in the moist bathroom environment.
Aging-in-Place Bathroom Remodel Checklist
A successful aging-in-place bathroom remodel requires planning across multiple dimensions: layout, measurements, accessibility features, safety elements, and durability. This checklist helps homeowners and contractors ensure nothing is overlooked.
Planning Your Layout and Measurements
Start by measuring your current bathroom and identifying constraints. Doorway width, hallway access, and existing plumbing locations all affect what's possible. A 36-inch doorway is the minimum for wheelchair access; wider is better.
Measure the space needed for fixtures: a toilet needs 15 inches from centerline to wall on each side, and 21 inches of clear space in front. A vanity with knee clearance requires 27 inches of space underneath.
Consider future needs, not just current ones. If aging-in-place bathroom design will serve you for 20+ years, plan for potential wheelchair access even if it's not needed now.
Lighting and Visibility
Adequate lighting is critical for aging-in-place bathroom design. Vision changes with age, and poor lighting increases fall risk and makes grooming tasks difficult.
Natural light is ideal where possible. A window in the bathroom provides daylight, which improves mood and visibility. If natural light isn't available, artificial lighting should mimic daylight color temperature (around 4000K).
Nighttime lighting matters too. A dimmed light or motion-sensor nightlight allows safe bathroom visits without blinding bright overhead lights. This simple feature prevents disorientation and falls during nighttime bathroom trips, a common time for elderly falls.
Waterproofing and Durability
Waterproofing is the invisible foundation of a durable aging-in-place bathroom. Water that penetrates behind tile causes mold, structural damage, and costly repairs. Proper waterproofing means multiple layers: a waterproof membrane under tile, sealed grout, and proper slope directing water toward drains.
At TRC Home Improvement, we use advanced waterproofing techniques. Water that seeps into subfloors or wall framing causes damage that's expensive and difficult to repair.
Durability extends to fixture selection too. Stainless steel grab bars resist corrosion. Porcelain tile is harder and more durable than ceramic. Non-slip surfaces maintain their grip over years of use.
Planning Element | Key Measurement | Why It Matters |
Doorway width | 36 inches minimum | Allows wheelchair access |
Hallway width | 36 inches minimum | Enables safe circulation |
Grab bar height | 33-36 inches | Proper use for sitting/standing |
Comfort-height toilet | 17-19 inches | Reduces strain on knees and hips |
Shower bench depth | 15-16 inches | Stable seating without obstruction |
Clear floor space at shower entry | 30 inches minimum | Room for balance or caregiver assistance |
Vanity knee clearance | 27 inches minimum | Allows seated or wheelchair access |
Retrofit Options for Existing Bathrooms
Not every aging-in-place bathroom design requires a complete remodel. Retrofit options let homeowners add accessibility features to existing bathrooms without demolishing everything.
A walk-in tub with a door is one retrofit option, it provides curbless entry and allows bathing without stepping over a traditional tub wall. A tub-to-shower conversion is often more practical: removing the existing tub and installing a curbless shower in its place creates a safer, more accessible bathing area.
Grab bars can be added to existing bathrooms with proper installation. If walls have studs in the right locations, bars can be mounted directly.
Toilet replacement with a comfort-height model is straightforward and doesn't require structural changes.
For rental properties or situations where extensive remodeling isn't feasible, grab bars, non-slip flooring treatment, and improved lighting are affordable retrofits that significantly reduce fall risk.
Planning an aging-in-place bathroom remodel can feel overwhelming, but breaking it into specific features and measurements makes it manageable.
Frequently Asked Questions
What are the most important features for an aging-in-place bathroom?
The most critical features include curbless or low-threshold showers to eliminate tripping hazards, grab bars installed at the right height and location for safe transfers, slip-resistant flooring to prevent falls, adequate lighting for visibility, and accessible vanities and toilets at comfortable heights. A layout with clear floor space for movement or wheelchair access, handheld showerheads, and lever-style faucet handles rounds out essential safety and usability elements.
How should you install bathroom grab bars for maximum safety?
Grab bars must be securely fastened to wall studs or blocking installed behind the drywall to support up to 300 pounds of force. Vertical bars should be placed 33 to 36 inches from the floor at the toilet and 33 to 36 inches at the shower. Horizontal bars in the shower work best at 33 to 36 inches high on the side wall and 48 inches high on the back wall. Space bars 1.5 inches from the wall and ensure they have a 1.25-inch diameter for a secure grip.
What type of non-slip flooring is best for aging-in-place bathrooms?
Non-slip tile with a textured or matte finish offers the best balance of safety, durability, and aesthetics. Look for tiles with a slip resistance rating of 0.60 or higher. Porcelain is more durable than ceramic and resists moisture better. Textured vinyl or rubber flooring provides excellent slip resistance but may not last as long as tile. Avoid glossy finishes, natural stone that becomes slippery when wet, and large format tiles that can be harder to navigate safely.
Can you convert an existing bathroom to be aging-in-place without a full remodel?
Yes, many retrofit options exist for existing bathrooms. You can add grab bars, replace a standard shower with a walk-in or curbless model, upgrade flooring to slip-resistant materials, install a handheld showerhead, and swap out faucets for lever handles. Replacing a standard toilet with a comfort-height model is straightforward. However, a tub-to-shower conversion or major layout changes typically require more extensive work. A design consultation can identify which upgrades deliver the most safety and usability for your situation.
How wide should a bathroom doorway be for aging-in-place design?
A doorway should be at least 32 inches wide for basic accessibility and 36 inches wide for easier wheelchair or walker access. This measurement is taken from the face of the door when it is open at a 90-degree angle. If your doorway is narrower, widening it may require structural changes. Lever-style door handles also improve accessibility over traditional knobs, allowing easier operation for those with limited hand strength or dexterity.
What should an aging-in-place bathroom remodel checklist include?
Start by measuring doorway width, floor space, and ceiling height. Plan your shower type (curbless, roll-in, or low-threshold), vanity height (30 to 34 inches is standard), and toilet height (17 to 19 inches for comfort-height models). Mark grab bar locations, lighting placement, and storage within reach. Choose slip-resistant flooring and verify waterproofing details. Confirm that faucets have lever handles and that the showerhead is handheld and adjustable. Review lighting layers: natural light, task lighting over the vanity, and ambient light for safety.
How long does a walk-in shower conversion typically take?
A tub-to-shower conversion usually takes 5 to 10 business days, depending on the complexity of your layout, any structural repairs needed, and custom tile design. Simple conversions with standard products may be faster. If water damage or rot is discovered, the timeline may extend. A design consultation and detailed estimate will give you a realistic schedule for your specific project. Proper waterproofing and curing time are essential, so rushing the process compromises durability.
What makes a waterproofed walk-in shower last longer?
Quality waterproofing uses a multi-layer approach: a waterproof membrane behind all tile surfaces, proper slope toward the drain to prevent pooling, a linear drain or sloped pan that directs water away from walls, and grout and caulk rated for wet areas. The substrate (cement board or waterproof drywall) must also be moisture-resistant. Sealing the grout after installation and maintaining caulk around edges prevents water infiltration over time. Professional installation with attention to these details ensures your shower resists leaks for decades.
Contact Us

Comments