

How to Measure for a Custom Shower Installation
Table of Contents
Standard Shower Sizes and Why Custom Measurements Matter
Bathroom Remodeling Measurement Tools You Actually Need
How to Measure for a Custom Shower Installation: Step-by-Step
Step 1: Measure Between Wall Studs
Step 2: Account for Wall Board Thickness and Finished Dimensions
Step 3: Measure Interior Depth and Floor-to-Ceiling Height
Measuring for Curb vs. Curbless Shower Entries
Curbed entry: measure the pan, then add the curb
Curbless entry: measure the elevation on both sides of the entry line
Clearances and code you have to measure for
Which entry type fits your measurements
How to Measure for Custom Glass Doors and Enclosures
Compensating for Out-of-Square Walls and Plumbing Offsets
How to Fix a Leaking Shower Pan: Why Accurate Measurement Prevents It
Conclusion
Frequently Asked Questions
Last Updated: September 16, 2026
Standard Shower Sizes and Why Custom Measurements Matter
A standard shower pan measures 60 inches wide by 30 to 32 inches deep, the footprint most production builders frame into a tub alcove. That works until your bathroom isn't standard, and most aren't once you open walls. Learning how to measure for a custom shower installation starts with what factory sizes assume: square corners, centered drains, and framing that hasn't moved since the house was built.
Custom measurements matter because a tiled shower is built in place, not dropped in. The pan, waterproofing, tile substrate, and glass all get cut to the space you actually have. Miss the true dimensions by half an inch and you're not returning a pan, you're rebuilding a curb.
Builders frame to nominal sizes, and finish materials add thickness on every side. A "60-inch" alcove rarely measures 60 inches between finished walls. At TRC Home Improvement, we've opened enough bathrooms in this region to know the surprises usually hide behind the drywall.
Key Takeaway Measure the rough opening first, then subtract for every layer you plan to add. The finished opening is what the glass and tile must fit, and it is almost never the number on the builder's plan.
Bathroom Remodeling Measurement Tools You Actually Need
The right bathroom remodeling measurement tools cost less than one return trip to the tile store, but the wrong tool for a given measurement is how errors creep in.
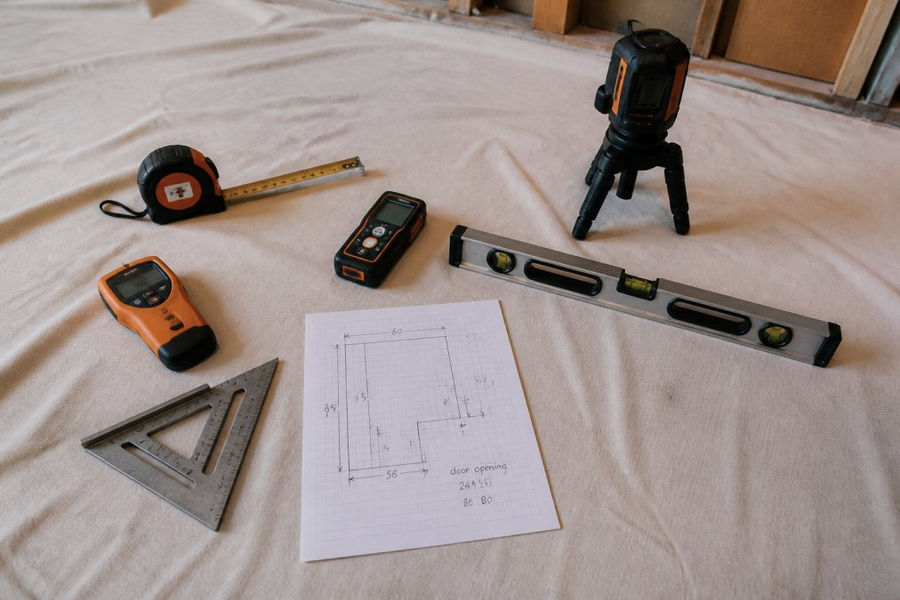
Tape measure, 25 feet or longer, with a locking blade. Your primary tool for rough openings, stud-to-stud spans, and pan dimensions. Look for a 1-inch-wide blade; narrower blades sag over long spans and read short. The sliding hook compensates for its own thickness, but it can bend after a drop. Check it against a known dimension before trusting a critical number.
Laser distance measurer. The one tool most homeowners don't own, and the one that solves the solo-measurement problem. A tape needs two hands at long spans; a laser reads a 10-foot wall by yourself in under a second. Accuracy is typically plus or minus 1/16 inch at close range, degrading slightly over distance. Use it for long spans and ceiling height, but verify the first reading against a tape before building a cut list on it. Borrow one for a single bathroom; buy one if you measure repeatedly.
Laser level. A self-leveling cross-line laser projects a true horizontal and vertical reference on all four walls at once, showing whether your backwall is plumb and whether the side walls are parallel. It's the fastest way to see a wall that leans out at the top before you order glass.
4-foot level. Use this to check plumb and level across the opening and confirm the floor is flat where the pan or curb will sit. A 4-foot level catches a floor that dips in the middle, which a 2-foot level will not. Check accuracy by placing it on a flat surface, marking the bubble position, then flipping it end for end; the bubble should read the same both ways.
Stud finder. Locates framing edges and centers without exploratory holes. Edge-finding mode is more reliable than deep-scan on walls with plumbing or conduit behind them. Mark both edges of each stud, then measure center to center; studs are nominally 16 inches on center, but older framing can be 24 inches or irregular.
Small square and a pencil. A speed square or framing square confirms whether corners are actually 90 degrees. Hold it in the corner and look for daylight along the blade. Pencil, not pen; pen bleeds through thinset and shows on light tile.
Notepad or a printed measurement sheet. Written dimensions with labels are what you build from. Photos help you remember context, but a photo of a tape measure against a wall is not a dimension you can order glass from. Record every number with its location and the date.
Tape measure, 25 feet or longer, 1-inch blade with a lock
Laser distance measurer for solo long spans and ceiling height
Self-leveling cross-line laser level for plumb and parallel checks
4-foot level for floor flatness and opening plumb
Stud finder with edge-finding mode
Speed square for corner checks
Pencil and a labeled notepad or printed measurement sheet
Pro Tip Before you start, verify your tape measure's hook against a known 12-inch dimension. A bent hook reads short on inside measurements, which is exactly the direction that ruins a glass order.
How to Measure for a Custom Shower Installation: Step-by-Step
Here's the process in order: measure the rough opening, layer in every finish material, then verify height and depth. Each step depends on the one before it.
Step 1: Measure Between Wall Studs
Measure between wall studs at three points: top, middle, and bottom of the opening. Record all three. If the numbers differ, your framing isn't square, and the smallest measurement governs what fits.
Find stud centers with a stud finder, then measure face to face. The rough opening is the framing dimension before any wall board, tile, or waterproofing goes on. Write it down with the location noted; you'll subtract from it next.
Step 2: Account for Wall Board Thickness and Finished Dimensions
Subtract every layer between the stud and the finished surface: cement board or drywall, waterproofing membrane, thinset, and tile all add up. A common mistake is measuring to the stud and ordering glass or a pan to that number. The finished dimensions will be smaller by the combined thickness of everything you add.
Do this math on both side walls and the backwall. If one wall gets a different substrate or thicker tile, the two sides won't match, and your glass enclosure will be cut asymmetrically to compensate.
Step 3: Measure Interior Depth and Floor-to-Ceiling Height
Measure interior depth from the backwall to the front edge of the opening, and floor-to-ceiling height at the center and both corners.
Measuring for Curb vs. Curbless Shower Entries
A curbed entry and a curbless entry are measured differently, and most guides stop at a definition.
Curbed entry: measure the pan, then add the curb
A curbed shower has a raised threshold, typically finished 4 to 6 inches above the bathroom floor, though the exact height is a design choice.
Curbless entry: measure the elevation on both sides of the entry line
A curbless entry sits flush with the bathroom floor.
Clearances and code you have to measure for
Both entry types must satisfy the same clearance rules.
Which entry type fits your measurements
Watch Out A curbless entry is not a curb with the top cut off. If the drain isn't set low enough to allow the required slope within the recess, water will pool at the entry line and find the seam. Confirm the drain elevation and the slope math before you frame.
Entry Type | Primary Measurement | What Decides Fit |
Curbed | Interior pan plus finished curb height and width | Curb top level within 1/8 inch; glass measured from curb top |
Curbless | Finished floor elevation on both sides of entry line | Recess depth supports 1/4 inch per foot slope to drain |
Both | Finished interior against 900 sq in / 30 in minimums | Door swing clearance to nearest obstruction |
How to Measure for Custom Glass Doors and Enclosures
Opening Type | What to Measure | Common Pitfall |
Curbed entry | Interior pan plus curb height | Forgetting the curb in glass height |
Curbless entry | Finished floor elevation both sides | Drain not set for slope |
Hinged door | Swing clearance and wall plumb | Door hits a fixture or wall |
Fixed panel | Smallest width across three points | Using the largest measurement |
Watch Out Ordering glass from the rough opening instead of the finished opening is the single most expensive measuring mistake. Glass can't be trimmed, and a remake means another full lead time before your shower is usable.
Compensating for Out-of-Square Walls and Plumbing Offsets
Out-of-square walls are the norm, not the exception, in older bathrooms.
How to Fix a Leaking Shower Pan: Why Accurate Measurement Prevents It
A leaking shower pan almost always traces back to a measurement or slope problem, not bad luck.
Conclusion
Measuring a shower correctly is unglamorous work that decides everything downstream.
Frequently Asked Questions
Should I measure from the studs or the finished wall?
Measure from the studs first to get the rough opening, then subtract for your wall board thickness. If you plan to use 1/2-inch cement board plus tile, you lose roughly 3/4 inch per side. For a custom shower installation, always give your contractor both the stud-to-stud measurement and your planned finish materials so they calculate the finished opening correctly.
What are the typical dimensions of a custom shower?
A standard shower pan is 32 to 36 inches wide and 48 to 60 inches long, but custom showers can be any size that fits your space.
How do you account for plumbing rough-ins when measuring?
Locate the drain center and the shower valve before you finalize any dimensions. Measure the drain's distance from each wall and note the valve height, usually 48 inches from the subfloor to the center. If you are converting a tub to a shower, the drain will likely need to move, so factor that into your layout. Accurate plumbing rough-in measurements prevent costly rework during a custom shower installation.
What are the most common shower installation mistakes to avoid?
The biggest mistakes are measuring only the finished wall instead of the studs, ignoring out-of-square corners, and failing to account for wall board thickness. Skipping the waterproofing layer or using the wrong materials around the curb also leads to leaks. Measure twice from multiple points, check for squareness with a diagonal measurement, and always plan for plumbing offsets before ordering any materials.
Contact Us


Comments